Friday, November 29, 2013

Turkey Sour-Cream Enchiladas

I love, love, love turkey combined with green chile.  The last Fairbanks NewsMiner newspaper posted my Turkey Tortilla Soup...I am delighted...but that is a truly a soup worthy of reposting as is.  I am now posting my recipe for Turkey Enchiladas.  I felt the need to modify it due to the fact that that we can't get the ingredients we need..  Here is what you need:  I forgot to put the green chile in the photo....you need 1 cup of green chile!!!


1 dozen corn tortillas, 2 cups diced onion, 3 cans Ro-Tel tomatoes, 1 cup green chile (can be omitted if you like, but we like it spicy), 1 cup water, 1 TBSP Mexican oregano 2 cloves of garlic-minced, salt and pepper.  3 cups shredded turkey, 2 cups sour cream, 2 cups cheddar cheese (I used white cheddar).


Soften the corn tortillas while you simmer the onion, garlic, tomatoes, water, oregano, green chile, salt and pepper. 
Mix together the cheese, sour cream and shredded turkey.  Place scant amount on top of softened corn tortilla, roll up and place seam side down in a casserole dish
Ok....I had to soften 4 more tortillas to use up the filling and fill the dish.

Now smother on the Sauce:  
Bake at 350 for 30 minutes...don't bother for 10 minutes.  Let it sit, then dig in.  Serve with more sour cream and fresh cooked pinto beans.


Tuesday, November 26, 2013

Meat Enchiladas

I feel a little guilty that I haven's posted recipes in such a long time.  I have actually written some, taken photos, but just never made the time to put them on my blog....my bad.  We have a freezer full of moose.  Jim wanted enchiladas.  I didn't want the same-ol-same-ol so I turned to a very old cookbook that I acquired long ago from Los Alamos, New Mexico.  New Mexican Dishes by Philomena Romero who lived in Los Alamos and ran a restaurant using her mother's (Senora Odila Archuleta) recipes is a great find. 

I can tell you the recipes in this cookbook are authentic New Mexican, no foo-foo recipes here.  There are only a few copies available through Amazon.com and they are a lot more expensive than the $2.89 sticker price I bought mine at.  The best advise I can give anyone who is not from the southwest is, when you order Mexican food and they ask you, "Red or Green", ask which is better----not hotter----better....Santa Fe restaurants typically make better red chile...if you are closer to the borders you are better off with green....If you are adventurous, you can say Christmas and you will get half red and half green....Safe to say in Santa Fe and Los Alamos...go with red!

Because I live in Alaska now and have an abundance of moose meat available to me I use that for most of my traditional (beef) recipes.  Feel free to use beef, bison or venison in place of the red meat. 

This is what Mrs. Romero recommends on page 11 of her cookbook.

1 1/2 lbs ground lean beef (yes, I used moose)
1 tsp. salt
1/2 tsp. cumin (nope....I like cumin....A LOT!  bump it up to a teaspoon)
1/2 tsp crushed oregano leaves (This is the part where I tell you there is a DIFFERENCE between oregano leaves and MEXICAN oregano....get the Mexican oregano...if you can't find it, tell me and I will get some for you on my next trip back home.)
1 clove garlic, minced fine
3/4 cup red chile powder (if you can't get that ask me and I will make sure you have some)....Use mild if you don't like a lot of heat, medium if you like your tongue to be tickled a little, and hot if you want to feel like the Energizer Bunny!
Water...enough to cover the meat.

Ok...I didn't want to throw you off by telling you that the original recipe calls for pressure cooking the meat in the water with spices because some people are really hesitant to use a pressure cooker.  If you don't have one or are scared, just boil the meat with the spices (EXCEPT the chile powder) for an hour.  Otherwise, crumble the ground meat, add enough water to cover meat.  Add salt, cumin, oregano, garlic and cover pressure cooker.  Cook 15 minutes at 15 lbs. pressure.  Bring pressure down quickly (you do that by leaving the pepcock on and running the pot under cold water.  When pressure is released, remove cover.  Add red chile powder, breaking all meat lumps with the back of a large spoon.  Set aside in a warm place.
After adding the red chile it looks like this.
Now you need to assemble the rest of the ingredients....it's a snap....Soften the corn tortillas in hot oil...dip them briefly in hot oil and drain on paper towels.  I should interject here that I ONLY use yellow corn tortillas...no decent New Mexican citizen would use white corn tortillas!  BAN them!  That's like serving pinks to your family....Ugh!  They are not as tasty, have been refined and just, just, just...yuck!

The next part I can do in my sleep I have been doing it so long.  Place a scant layer of sauce in the bottom of a baking dish...not too much...just enough to keep the enchiladas from sticking. 

You have finely diced onions and shredded cheese on the standby.   Place a bit of cheese and onion in the middle of the softened tortilla and roll it up.  Place this roll in the dish and repeat until the pan is full.

Now cover the rolled enchiladas with the rest of the red chile meat sauce.  Top that with extra cheese and bake at 350 for 40 minutes.

Serve with chopped fresh cilantro, tomatoes, and sour cream if you like.  At this point, Jim is usually opening  can of beer.

I know it seems like a lot....but it's really not.  From start to finish it takes under an hour to do.

Tuesday, July 16, 2013

Sushi 101 - Dragon Rolls

So I went to my first ever sushi class yesterday.  What's a girl from New Mexico doing in a sushi class anyway?  Moving to Alaska nine years ago today I had no clue about what I was in for.  1) heating with oil instead of gas or propane? 2) hauling water?....isn't that for heathens?  3) plugging in your car in the winter...why would anyone do that?  4) seeing sushi at the deli counter in all the grocery stores....what is that stuff?  And....what is wasabi anyway?  I think I have to thank my friends Heather Chorley and Bobb Lockwood for introducing me to the world of Japanese food and sushi.  You don't get a lot in the way of sushi in Aztec, New Mexico...so I was completely ignorant as to what it was about but I quickly fell in love with the taste and texture of it.  This year, the Fairbanks Summer Arts Festival  offered a class in sushi and I quickly signed up.  Good thing I did...the class was completely full and I was the last person able to register.  Calvin Lin from the Asian Bistro on Airport Drive was our teacher.  He showed us how to make California Rolls, Sashimi and Nigiri rolls, hand rolls and Dragon Rolls.  The hardest part about making sushi is getting the rice just right.  Calvin's recipe was perfect!

Here is what you need:
Equipment:
Bamboo sushi roll mat covered in plastic wrap...this was a trick he taught me that really worked....it keeps the mat clean and rolls the rice beautifully!
Cutting board
Sharp knife
Nori seaweed sheets
Rice Cooker or big heavy saucepan
Wood spoon or rice paddle
Plastic wrap (lots of it)

Rice Ingredients:
6 TBSP rice vinegar
2 TBSP sugar
2 tsp. salt
3 Cups uncooked Japanese medium-gran sushi rice (I used Calrose)
4 cups water
OR....Use 6 TBSP of Seasoned Rice Vinegar instead

Sushi Ingredients:
5 sheets of sushi nori (big squares or more if using the smaller ones)
Fully cooked Eel (Dragon Rolls)
1 large cucumber, peeled and sliced thin...remove the seeds
2-3 avocados, sliced
Cooked crab or imitation crab sticks
Wasabi
Soy Sauce
Pickled Ginger

Making sushi rice:
Either use 6 TBSP of seasoned rice vinegar OR make your own.  Here is the recipe to make your own.
In a small saucepan over medium heat, combine rice vinegar, sugar, and salt.  Heat until the sugar dissolves and don't let it boil.  Remove from heat and let it cool.

Rice:  PREPARE THE RICE 2 HOURS BEFORE YOU WILL MAKE THE SUSHI
Wash rice, stirring with your hand, until the water runs clear.  Keep going....this is not clear....

Put in a bowl with water and let it soak for 30 minutes.  Drain in a colander and leave in a bowl inside the fridge for 30 more minutes.  Put rice in a big pot, add 4 cups water,
bring to just a boil, turn down the heat to low/simmer for 15 minutes.  Remove from heat and allow to sit for 15 more minutes.  Transfer to a large bowl, loosen the rice grains with a rubber spatula or wooden spoon by folding and chopping...do NOT stir.  Sprinkle seasoned rice vinegar over rice and fold in.  Cover the bowl with a damp cloth while you work. 


Assembly:
Place a piece of Nori on the bamboo mat shiny side down...dull side up.  Using your hands, form a snowball shaped ball of rice...It's more than I ever thought they would have used.
  Place on nori sheet and spread to the sides. 
Turn the rice covered nori over and put 1 piece of Krab in the middle, add 2 thin slices of cucumber and slices of avocado. 
Using the bamboo mat, roll up to cover the krab and other ingredients.  You are putting more pressure on the outsides of the bamboo mat and not so much on the top.  Be firm with it.  My problem is I was always too gentle....Nope, make the rice do what you want it to do.  Don't push too much from the top.

Now, alternate with avocado, unagi, avocado, unagi...etc on top of your sealed roll.  Place plastic wrap on top of that and use your bamboo mat to press this in gently.


Remove the roll from the bamboo mat before you cut....I was stupid and didn't do this in the picture!!!!  Using a very sharp knife, cut through the plastic wrap and unagi  roll sections to create bite sized pieces....I could have done better here. 


Dress with unagi sauce. 


Sunday, July 7, 2013

Poor Mans Lobster (Halibut)

"What?  Boiled halibut?  You've got to be kidding me!"  I exclaim.  "No, it's really good and it tastes just like lobster if you do it right." say's someone in the teacher's lounge last year.  When it comes to cooking, I'm game for anything.  Since I have an abundant supply of halibut, I felt it would be okay to sacrifice one of my 1 lb. packages to test this recipe out.  She was right!  Jim and I both loved it.  Now when I cook halibut I take out an extra package to prepare this "Poor Man's Lobster."  Not a poor man at all if you know what halibut costs even in Alaska.

This recipe is so incredibly simple that even the most amateur of amateur cooks could master this dish with the most minimal ingredients in the kitchen.

What you need:
5 cups Water
1/4 cup Salt
1/2 cup Sugar
3 TBSP Lemon juice (yes, you can use bottled)
2 TBSP Butter
Halibut (1-2-3 lbs....you decide.  How many are you feeding and how are you serving it?)
Optional:  Melted butter with chopped rosemary OR garlic salt to taste---or both

Wow....how easy is that?

Directions:

1.  Skin halibut and cut into desired chunks....maybe 2" squares and set aside.

2.  Measure water salt, sugar, lemon juice and butter into a sauce pot and bring to a boil.

3.  Add halibut chunks to boiling water.  As they begin to float to the surface they are DONE.  Do NOT overcook.

4.  Remove the almost "floaters" to a paper towel to drain.

5.  Optional:  Toss drained "lobster" in rosemary/garlic salt butter

6.  Serve this with a salad (even prepackaged) and you are an instant hit.


Friday, July 5, 2013

Aunt Tony's Macaroni Salad

Nothing screams 4th of July more than fireworks and macaroni salad!  Growing up with a large extended family, it was common to expect certain things when coming together as one huge family.  On our table one would find:  1) fresh veggies like granddad's peas or beans, sliced tomatoes and cucumbers 2) a big bowl of home canned peaches or pears or apricots and 3) an obscenely huge bowl of Grandma Sadie's or now I know it as Aunt Tony's Macaroni Salad.
Aunt Tony with Cousin Judy and Ron

My Grandma Sadie and Aunt Tony have both passed on and I wish I had paid more attention in the kitchen.  Let me interject here that there are only a few foods that I don't care for, raw cabbage and macaroni salad.  I DO however, take exception to this fantastically creamy and easy to make salad.  Cousin Judy gave me the recipe a few days ago and I made it for the first time for our 4th of July dinner.  It was heavenly and brought back loads of beautiful memories spending time with cousins, aunts, uncles and my grandparents.  The celery seed is really the key ingredient that pushes this recipe over the top!

I found that it was just as good for breakfast the next day and only got better sitting overnight in the fridge.  The ingredients are so simple and are common in most pantries.

Here's what you need:  That's it!  So simple.

Because it's just Jim and I, I only used 1/2 a box of macaroni which still made enough to feed 6-8.  Imagine using the entire 1 lb. box!  That feeds 16-20 people.

8 oz. macaroni
1 to 1 1/2 cups REAL mayo (don't use salad dressing)
4 boiled eggs, chopped
1 4 oz. jar diced pimentos
1 TBSP celery seed
salt and pepper to taste
cream or half & half (maybe....if it is not moist enough---I didn't have to use it)
Paprika (optional) to lightly dust the top

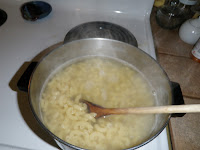
Boil macaroni in salted water for 8-10 minutes.  

Boil in salted water 8-10 min.
Drain in a colander and rinse under cold water.  Allow the macaroni to cool.  I don't know why but Judy said this makes a big difference so I did it.  

Add chopped eggs, pimentos, celery seed and mayo.  Mix together.  It should be creamy.  Add salt and pepper to taste.  If needed, add a teaspoon or so of cream to make moist.  Pour into a pretty dish and top with a light shake of paprika to give color.

Yes, this an old fashioned vintage Pyrex dish!


Wednesday, June 12, 2013

Cary Fremin's Halibut Dip

My good friend and colleague Cory Goodman brought this amazing halibut dip to a potluck at school.  It was a huge hit and I asked for the recipe.  It is a hot dip, both in the sense that it is baked in the oven and that it contains jalapenos.  What better combination that halibut and jalapenos?  Along with the addition of cheese, sour cream and mayonnaise, what is NOT to like?  Thank you Cory for allowing me to publish your sister's recipe here.  Oh yeah....here is a picture of my friend Cory.


 Ingredients:

1 cup sour cream
1 cup mayonnaise
1 cup Parmesan cheese
1 TBSP dill
2 TBSP pickled jalapeno, diced fine
2 TBSP pickled jalapeno juice
3 TBSP butter
4 garlic cloves, minced fine
1 lb. cooked and flaked halibut (cooked in butter and garlic)

Instructions:
Skin and cut halibut into 1 1/2" pieces.  Saute in 3 TBSP of butter and 4 cloves of minced garlic. Remove from stove and allow to cool, then shred or flake.  Mix the sour cream, mayo, cheese, dill jalapeno, and jalapeno juice together.  Add the shredded halibut and stir well to mix together.  Bake in the oven for 30 minutes.  Serve warm with crackers, bread slices or chips.

This dip is Divine!  Thanks for sharing Cori and Cary!


Tuesday, June 11, 2013

Baked Cheese and Broccoli Patties

Jim and I both LOVED these delicious little patties.  I'm always on the lookout for recipes to make for my vegetarian friends as well as recipes that I can use veggies from my garden.  I learned something new today:  lacto-ovo vegetarians eat eggs and dairy products but not flesh.  My friend Cory Goodman shared this recipe with me via Facebook and it comes from SkinnyTownUSA (look for them on Facebook).  These patties were so easy to make, are healthy because they are baked not fried, clean-up is a snap, and were absolutely scrumptious.

Here's what you need:

Ingredients:
2 tsp olive oil
2 cloves garlic, minced
1/2 onion, diced fine
1 16 oz. bag frozen broccoli, defrosted and rough chop
1 cup panko crumbs
1/2 cup cheddar cheese, grated
1/3 cup parmesan cheese, grated
2 eggs, beaten
salt and pepper

Step 1:  Preheat the oven to 400 degrees F.  Line a baking sheet with foil and spray lightly with non-stick spray.


Heat oil and saute the onions and garlic until softened.  Season with salt and pepper.  Set aside to cool.


Step 2:  Place the thawed broccoli in a kitchen tea towel and twist each end tightly to remove any excess water.  In a bowl, beat the eggs and mix in the cheeses.  Give the broccoli a rough chop.


Step 3:  Add the broccoli, garlic, onions and panko crumbs to the egg/cheese mixture and mix well.


Step 4:  Form patties and place on baking sheet (this recipe made 12 patties).   

Step 5:  Bake in preheated oven for 15 minutes.  Remove from oven and allow to cool slightly (20-40 minutes This will help them to keep firm).  Flip the patties over and cook for another 15 minutes.

ENJOY!  I can see dipping these in a garlic aioli, mayo/dill or ranch dressing if one was so inclined.  They are great on the go snacks and are just as good cold as they are hot.


Thursday, June 6, 2013

Barbecue Ribs with High-Bush Cranberry Barbecue Sauce

Summer has officially begun and what better way to kick it off than with barbecue.  The key to any good barbecue is in the sauce.  In the fall every year, I put up pints of high bush cranberry ketchup.  I'm not a big fan of ketchup, but I do love this recipe.  I make this ketchup from the very cranberries that grow around the perimeter of my yard.  The barbecue sauce recipe I am including here is both sweet and hot with the bite of cayenne pepper.  Make the sauce first, refrigerate overnight, then do the ribs.  If you are in need of high bush cranberry ketchup email me and I will see that you get a pint.

Barbecue Sauce:

2 cups high-bush cranberry ketchup
1/2 cup water
1/3 cup apple cider vinegar
1/3 cup brown sugar
2 TBSP yellow mustard
1 TBSP onion powder
1 TBSP garlic powder
1/2 tsp cayenne

Combine all ingredients in a saucepan over low heat.  Stirring occasionally and simmer for 20 minutes.  The barbecue sauce should be thin but not watery.  Allow to cool and store in a Tupperware container for 24 hours in the refrigerator.

Ribs:

5 1/2 lbs Boneless Country Style Pork Ribs
2 1/2 TBSP garlic powder
2 tsp restaurant quality black pepper
1 TBSP Salish (smoked salt---get it at Fred's in the Deli)
2 TBSP Kosher salt

 Step One:
These are the ingredients you need.  The Salish does make a difference!  I hope you can get smoked salt where you live.  It is also great on grilled fish.


Step Two:  Use a large pot, cover ribs with water and add all but the BBQ sauce.


Step Three:
Boil for 45 minutes.


Step Four:
Remove the ribs from the water and place in a large baking dish.
 

Step Five:
Reserve 1/2 cup of sauce for ribs after they are out of the oven.  Cover with 1/2 the sauce, turn over and cover with the other half.  Cover with foil (I like to use the no-stick stuff---it really works).
Bake me at 325 F for 1 1/2 hours.

 Step Six:
Bake at 325 F for 1 1/2 hours or until ribs are at 160F (internal temp) and tender.  Brush with the remaining 1/2 cup of sauce and serve.


Sunday, April 28, 2013

Boewares Moose Sausage Stew

Bowewares Sausage is a sausage made in South Africa.  My good friend Katherine Helmuth taught me how to make this sausage from moose meat that I needed to use.  It calls for a combination of cardimom and allspice and other strange spices.  Two years later, I see this sausage in the freezer and realize I need to use it up.

So I have made a Bowewares and Bean Soup for my school family tomorrow.  It is a little on the spicy side, full of flavor and loaded with lots of jam-packed veggies.  Please use Kielbasa instead if you don't have moose.

This is what you need:

4 1/2 cups ham broth (look for Better Than Broth in your grocery isle)
1 29 oz. can diced tomatoes
1 each 14 oz can rinsed and drained:
   Kidney beans
   Great Northern Beans
   Garbanzo beans
2 medium bell peppers, chopped
2 onions, chopped
1 cup celery ribs, chopped
2 cups zucchini, halved and sliced
1 lb. sliced white mushrooms
2 tsp. chicken bouilllion
5 garlic cloves, diced
2 1/2 tsp. chipotle chile powder
4 tsp. dried basil
4 tsp. Italian Seasoning
2 tsp. salt
2 tsp. pepper
4 bay leaves
3/4 lb. fully cooked sausage (Grill, cool and slice into large slices).

Grill the sausage or Kielbasa.  Cool, slice about 1/2" thick.

Combine all ingredients except the sausage in a large soup pot.  Bring to a boil and simmer for 1 hour.  Add cooked sausage and heat through.  Serve with some whole wheat sourdough bread.

This is a really yummy and fortifying soup!


Saturday, April 13, 2013

Halibut! Oh sweet halibut! Halibut Pockets

We LOVE FISH!  Especially fish we catch ourselves.  Personally, I think that since we have lived in Alaska we have a duty to eat what we put into our freezer at least once a week.  Jim found this recipe and asked me to make it.  #1...the original recipe called for rock fish and did not include Halibut and #2 I didn't have any of the spices or could get them!  But I saw value in the recipe and decided to adapt it .  I like all the ingredients included but felt it should have a more well-rounded flavor...more dill, garlic, and lemon.  About a year ago I learned the value of parchment paper pre-made pockets.  Here's the promo....go get them at Safeway in the foil aisle!  Same section as the CrockPot Condoms that will save you time and energy in clean up!  They are great!  Especially for delicate fish...not to say that halibut is a delicate fish...but parchment paper cooking force the fish "steam" rather than cook...there is a difference!  Fish that is steamed has a lighter and more delicate texture (which I prefer).

The hunky hubby and I have our halibut packaged in 1 lb. portions...just right for the two of us.  This recipe is for two people.


You need...Parchment paper or parchment paper envelopes, lemon juice, halibut seasoning ( I use Pike's Place Fish Northwest Seafood Seasoning....but just use a combo of dill, garlic, but you can use a combo of celery seed, dill garlic, lemon, on, pepper and sea salt that is soaked in 2 TBSP of white wine.)

1/2 a red onion sliced thin
1/3 red and green bell pepper
2 small zucchini sliced about 1/2"
20 grape tomatoes sliced in half
2 cups collard greens (come see me if you need some)
1 lb white fish.....I am using halibut tonight
2 TBSP lemon juice
4 TBSP butter

So easy!  Put the parchment envelopes on a baking sheet.  Layer with onion, peppers, zucchini, tomatoes and collard greens.
Now smear the seasoned halibut with the rub, top with lemon juice and butter.  Place on top of the veggies.
Wrap up the parchment paper tight and bake at 350 F for 15 minutes or until done.

Let stand for 5 minutes before cutting open.

Sunday, March 31, 2013

Cheese Stuffed Sweet Peppers with Marinara Sauce

If you are not a member of Justapinch.com and love to cook, you should be.  This marinara sauce is, "Hands-Down," the best I have ever made.  This would also be an EXCELLENT pizza sauce!  The recipe came to me through Justapinch.com weeks ago.  I bought the ingredients last week then got busy and forgot about it until cleaning out the fridge for Easter and said, "Oh yeah...that's why I bought that!"  Funny thing is, I had forwarded it my Mom in New Mexico.  So I called her yesterday afternoon on my birthday and I tell her what I'm making for dinner.  She starts giggling and I know something is up!  She's making the same thing at the same time and has also changed up her recipe a little!  HA!  Also, for my vegetarian friends, there is no reason you need to add meat to this dish.   It would be just as good without meat.  The original recipe called for ground turkey.  I didn't want turkey, I wanted the Isineros (I know I'm spelling that wrong) organic Italian Chicken Sausage.  That was a great substitute!

We both agree that the recipe needs to be served over pasta!  She has whole wheat penne and I have the regular...check!  We used a different mix of cheeses, but we both agree this one is a keeper!  When I make this again....and I will, I would add mushrooms to the list of ingredients.

This is what you will need, don't freak out, I know it looks like a lot, but it's really manageable and easy to prepare.

Sauce:
1 lb. Isineros Italian chicken sausage
8 cloves of garlic, minced
1 onion, diced
2 tsp. Italian seasoning
1 tsp. dried basil  (HA!  I used my own home-grown Queen of Sheba basil)
1 tsp. Mrs. Dash Tomato and Basil (I did buy this and use it and am glad I did)
1 tsp. onion powder
1 tsp. black pepper
2 cans (15 oz) diced tomatoes with oregano, basil and garlic
4 oz can tomato paste
2 cups fresh, diced tomatoes
1 TBSP sugar
1 tsp lemon juice
salt and pepper to taste

Stuffed Peppers:
about 14 mini bell peppers (I get them at Sam's Club)
16 oz light ricotta (I used 15 oz. of Greek yogurt)
8 oz shredded provolone cheese
6 oz grated Parmesan cheese
1 egg

Dice your onion and garlic.  Cook garlic and onion with the chicken sausage in a Dutch oven pot with about 1 TBSP olive oil.  Cook until onions are tender.  Add tomatoes, tomato paste, and fresh tomatoes.  Add the dry seasonings, sugar and lemon juice.  Simmer 45 minutes.


Now mix together the yogurt or ricotta, provolone and most of the Parmesan and egg (save about 1/2 cup of asiago or Parmesan to top AFTER it has baked. 

Cut off the tops of the peppers and remove the seeds and veins.  Stuff with the cheese mixture.

Ladle 1/2 of the marinara on the bottom of a baking dish, top with stuffed peppers, ladle the other 1/2 of marinara on top of that.  I always have left over cheese mix....just dollop that on top of the marinara and spread it over gently...a little more cheese never hurts and who wants to waste?  Bake at 375 degrees F for 45 minutes.  Now cook your penne pasta.  Reduce the heat on the peppers to 350 and continue cooking for another 20 minutes or until peppers are soft.  The pasta and peppers will be ready at the same time.


 By the way, this isn't important, but this is my FAVORITE kitchen tool!  I bought it over 25 years ago at a store in Alamogordo that doesn't even exist anymore.  It's the most useful tool in the kitchen and I'd be lost without it.